Control the arm
Once you have instantiated the Reachy object, you are actually connected to your robot. This means that the hardware (sensors and effectors) are synced with their software equivalent. This synchronization loop runs at about 100Hz. In particular, this lets you retrieve the arm(s) state and send commands to make it move.
Before actually running some commands, it's important to make sure you are ready:
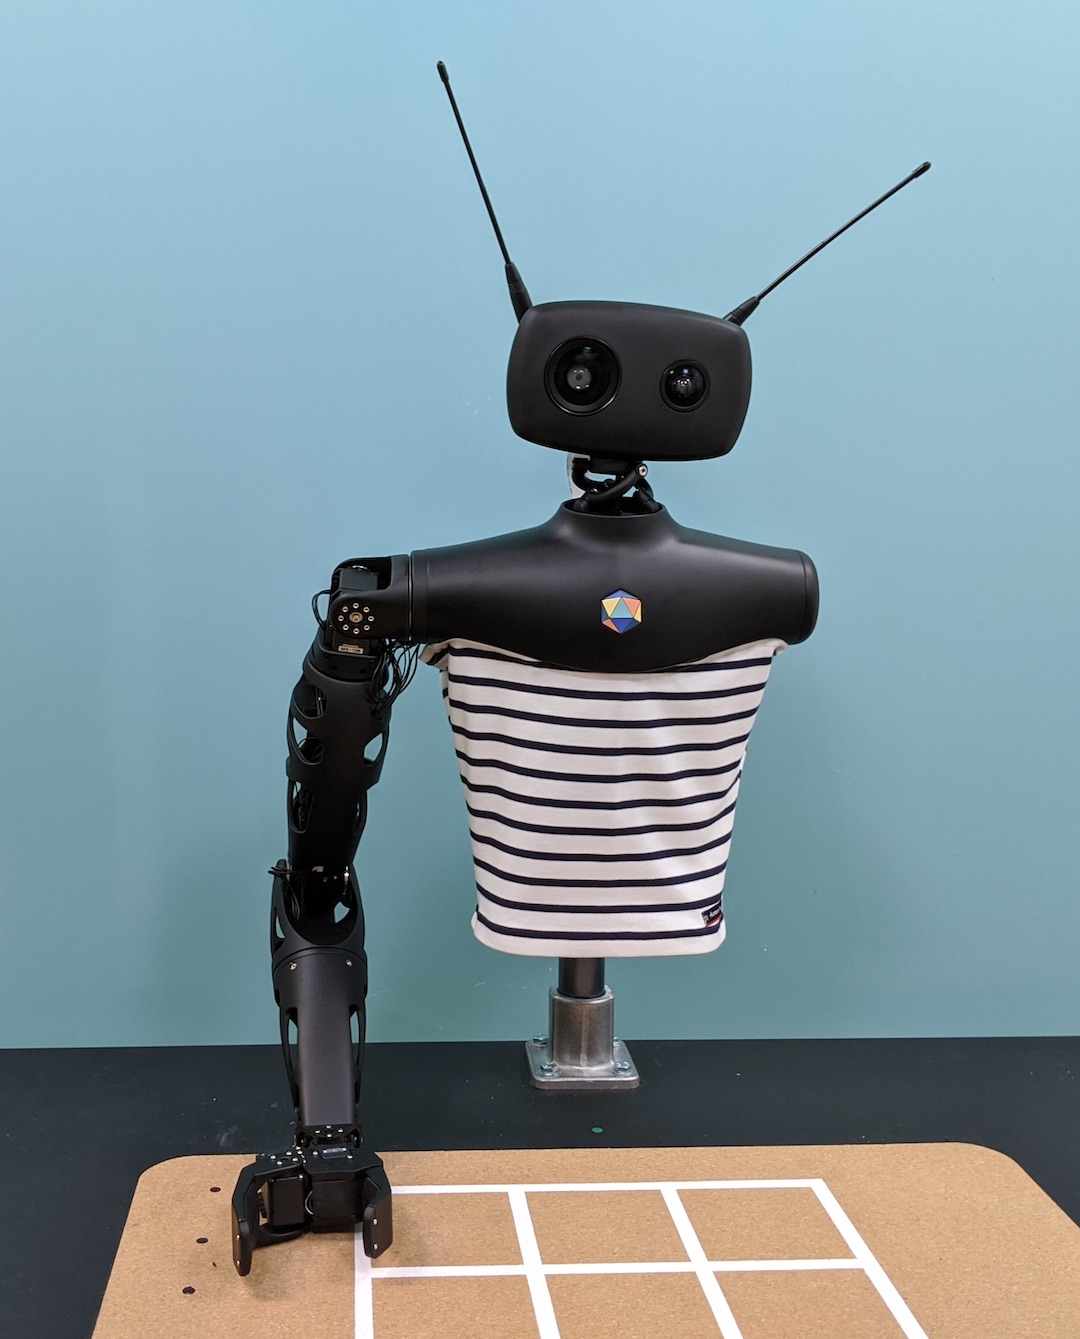
- Make sure the robot is in a “safe” state (as shown in the images below for instance). If a wire is blocked or a motor is completly reversed, sending target position or even turning the motor on may result in a violent motion that may damage the robot.
- The motor are powerful so they can make the whole arm move fluidly. Do not hesitate to first try the move you want to make, with a low speed (we will show how to do that below). When you are sure everything is okay, you can increase the speed again.
More information is available on the Safety first section. It provides simple guidelines to avoid damaging your robot.
In the examples below, we will show examples on a right arm. Using the left arm instead should be straightforward. Always make sure that the different commands suggested below make sense in your context:
- angles from a right arm to a left arm may differ
- if your robot is attached in front of a desk or can freely move
- etc.
Everything is setup? It's time to make Reachy move!
Moving individual motors
Reachy's upper arm is composed of 4 motors:
- shoulder_pitch
- shoulder_roll
- arm_yaw
- elbow_pitch
And depending on the hand used, usually 3 or 4 others motors. For the force gripper, you have:
- forearm_yaw
- wrist_pitch
- wrist_roll
- gripper
Each of these motors can be controlled individually.
Higher-level ways to control the whole arm are shown in the next sections.
They are servo motors that you control in position. You can also control their compliancy or their torque limit. Theses motors are also behaving as sensor, so their present position can also be read at any time.
To access a specific motor (here elbow_pitch) in Python code:
reachy.right_arm.elbow_pitch
>>> <DxlMotor "right_arm.elbow_pitch" pos="-83.209" mode="stiff">
And to get its present position:
reachy.right_arm.elbow_pitch.present_position
>>> -83.121
The codes above assume that you already instantiated your Reachy, as shown in the section Instantiate Your Robot and assigned it to the reachy variable.
In a more general manner, you can access any motor by using reachy.part_name.motor_name.
Please note that the part name can also be nested (e.g. right_arm.hand). All available parts are:
- right_arm
- right_arm.hand
- left_arm
- left_arm.hand
- head
If one part is not present in your robot, it's value will simply be None.
For each motor, we have defined angle limits. They correspond to what moves the arm can actually make. For instance, the elbow pitch is limited from 0° to 125°. The forearm yaw can move from -150° to 150°.
The zero position of each motor is defined so as when all motors are at 0°, the arm is straight down along the trunk. For more information on the motor orientation and configuration, please refer to the section Arm coordinate system.
While each motors has angle limits corresponding to what it can do, all combinations of these limits are not reachable! When moving a motor, you always have to take into consideration the configuration of the other motors.
Compliant or stiff
The servo motors used in Reachy's arm have two operating modes:
- compliant: the motors is soft and can be freely turned by hand. It cannot be controlled, setting a new target position will have no effect. Yet you can still read the motor position.
- stiff: the motors is hard and cannot be moved by hand. It can be controlled by setting new target position.
When you turn on your robot, all motors are compliant. You can freely move Reachy's arm and place it in its base position.
To make Reachy keep its position and let you control its motors, you need to turn them stiff. To do that, you can use the compliant property.
For instance, to make the elbow stiff, run the following code:
reachy.right_arm.elbow_pitch.compliant = False
Now, the elbow should be hard, you cannot move it by hand anymore.
To turn it back compliant, simply run:
reachy.right_arm.elbow_pitch.compliant = True
Setting a new target position for a motor
Assuming the motor is now stiff, you can now make it move. Once again, make sure the target position you will set corresponds to a reachable position in your configuration.
To make our motor move, we will use the goto method. We will define a target position and a move duration. Let's try having our elbow at 90° in 2s:
reachy.right_arm.elbow_pitch.goto(
    goal_position=90,  # in degrees
    duration=2,  # in seconds
    wait=True,
)
When running this code, you should see the motor move.
The wait=True option blocks until the move is actually done. You can set it to False and the function will return immediatly.
Be careful not to have two trajectories running on the same motor in parallel! This could result in an unpredicted behavior (Trajectory are not thread safe).
Let's try to move another motor, the arm_yaw:
reachy.right_arm.arm_yaw.goto(
    goal_position=20,
    duration=2,
    wait=True,
)
Run this code… And if you followed this documentation closely, your motor should not have moved… Can you guess why? Yes, indeed the motor is still compliant. You have to turn it stiff and then run the code above again.
As a safety measure, when turning a motor stiff, its goal position is reset. This avoids to directly jump to a new position when you turn the motor stiff. Indeed, the target position is stored inside the motor and could be kept even if you restart your Python script.
goto vs goal_position
To control & motor in the examples above we used the goto method. A lower API to control the motor is to directly use the goal_position property.
Yet, you should be careful when doing so, because the motor will try to reach this new goal position as fast as it can. And it is really fast (up until ~600-700 degrees per sec)! A workaround is to also use the moving_speed property to set the maximum speed that the motor can reach.
reachy.right_arm.elbow_pitch.moving_speed = 50  # in degrees per sec
reachy.right_arm.elbow_pitch.goal_position = 110  # in degrees
Yet, in our experience, when using this approach for controlling a motor, it may be hard to follow smoothly complex trajectories and have precise timing. You only set the maximum speed but have no control over the acceleration.
The approach used in the goto method differs in a sense that it only using position control (the maximum speed is allowed)
A full position trajectory profile is actually generated going from the current position to the goal position. This trajectory is then interpolated at a predefined frequency (100Hz) to compute all intermediary target position that should be followed before reaching the final goal position. Depending on the interpolation mode chosen, you can have a better control over speed and acceleration. More details are given below.
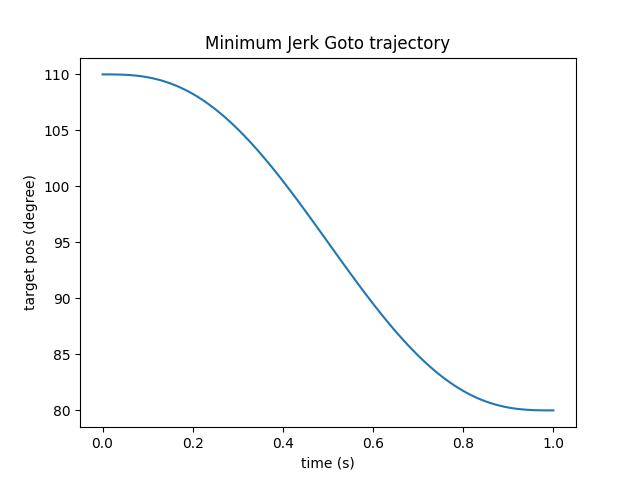
For instance, the code below will make the elbow_pitch motor follow this curve (assuming the motor was still in 110°):
reachy.right_arm.elbow_pitch.goto(
    goal_position=80,  # in degrees
    duration=1,  # in seconds
    wait=True,
    interpolation_mode='minjerk',
)
Remember to reset the maximum speed of the elbow_pitch before runing any goto on it. To reset the maximum speed of a motor (using no speed limit) simply set it to 0:
reachy.right_arm.elbow_pitch.moving_speed = 0
Moving multiple motors at once
Most of the time when controlling a robot, you want to move multiple motors at once. While you can do it by running multiple goto and using the option wait=False, there is a simpler way.
You can actually use a goto the robot level and specify a list of (motor, target_position). This will create a trajectory for each motor and run them all in parallel.
To move both arm and forearm yaw at the same time, you can run:
reachy.goto(
    goal_positions={
        'right_arm.arm_yaw': 45,
        'right_arm.hand.forearm_yaw': -45,
    },
    duration=2,
    wait=True,
)
Note the use of the complete motor name (eg. ‘right_arm.hand.forearm_yaw’) as a key string in the goal_positions dict.
Motors from different parts can be mixed in the same goto.
reachy.goto(
    goal_positions={
        'head.left_antenna': 0,
        'head.right_antenna': 0,
        'right_arm.elbow_pitch': 90,
    },
    duration=2,
    wait=True,
)
You can concatenate multiple goto simply by using the wait=True option and running both codes sequentially:
reachy.goto(
    goal_positions={
        'right_arm.arm_yaw': 45,
        'right_arm.hand.forearm_yaw': -45,
    },
    duration=2,
    wait=True,
)
reachy.goto(
    goal_positions={
        'right_arm.arm_yaw': 0,
        'right_arm.hand.forearm_yaw': 0,
    },
    duration=1,
    wait=True,
)
You can also define positions, save them and then directly go to those positions.
first_pos = {
    'right_arm.arm_yaw': 0,
    'right_arm.hand.forearm_yaw': 0,
}
second_pos = {
    'right_arm.arm_yaw': 45,
    'right_arm.hand.forearm_yaw': -45,
}

for _ in range(3):
    reachy.goto(goal_positions=first_pos, duration=2, wait=True)
    reachy.goto(goal_positions=second_pos, duration=1, wait=True)
An easy way to define a position is to actually record it directly on the robot. To do that, you can play with the compliant mode so you can freely move the robot and make it adopt the position you want. Then, you can record its position using a code similar to:
current_arm_position = {
    motor.name: motor.present_position for motor in reachy.right_arm.motors
}

current_reachy_whole_position = {
    motor.name: motor.present_position for motor in reachy.motors
}
Make sure only the motors you want to track are actually included in the position you have recorded.
Different trajectory interpolation
All goto accept a interpolation_mode argument. This lets you define the way you want the trajectory to interpolate from A to B.
It cames with two basic way:
- linear interpolation
- minimum jerk
Running the same goto (from 0° to 90°) and changing the interpolation mode from linear to minjerk will result in the two different trajectories:
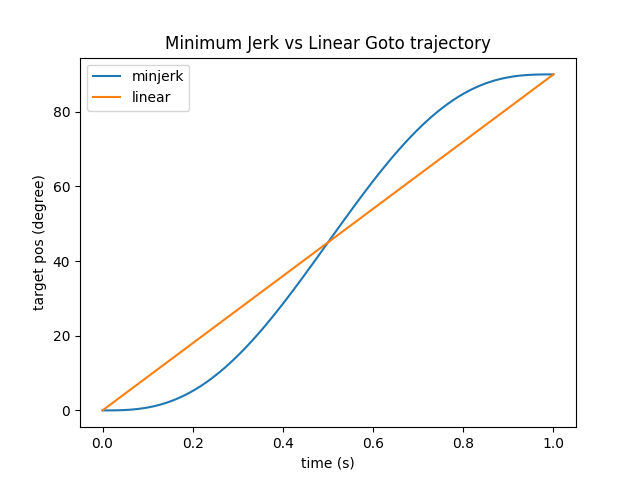
Note that both trajectories start and finish at the same points. Yet, the followed positions and therefore speed and acceleration differs quite a bit. The Minimum Jerk will slowly accelerate at the begining and slowly decelerate at the end.
What's show in the figure above is a theoretical trajectory. The motor has a low level controller that will try to follow this curve as closely as possible. Yet, depending on the speed/acceleration that you try to reach and the motor configuration, if it has to move a big loads, the real and theoretical curves may differ.
Grasping
While the motors of the Force Gripper hand can be controlled like the rest of the motors of the arm, there is an additional functionality that lets you easily close and open the gripper.
Opening the gripper is as simple as:
reachy.right_arm.hand.open()
This actually simply runs a goto on the gripper motor with pre-defined target position (-30°) and duration (1s).
More interestingly, you can also use the close method:
reachy.right_arm.hand.close()
This also runs a goto on the gripper, but it uses the force sensor inside the gripper to detect when it did grab something. It will try to automatically adjust the grip, to maintain enough force to hold the object while not forcing too much and overheat the motor.
All parameters used in the close method can be adjusted depending on your needs (please refer to the the APIs for more details).
The gripper on Reachy's end effector is not meant to hold objects for a long time. The motor used in the gripper will quickly overload if doing so. Holding objects as you can see on the TicTacToe demo for instance is a good approximation of what the robot can do for long period of time (hold ~5s rest ~10s).
If you need to hold objects for longer period of time, you probably need to have a specific gripper for this task. While this is part of Pollen Robotics plan, we do not yet have a ready-to-use solution for this kind of use. Let us know if you would be interested in such features or want to help design one.
The Force Gripper also gives you access to the current grip_force. The load sensor is located inside Reachy's gripper. It measures the force applied on the gripper (exactly it measures the deformation of the gripper due to the grasping).
print(reachy.right_arm.hand.grip_force)
>>> 123.1
The returned value is nor accurate nor expressed in a standard unit system. Only relative values should be taken into account.
For instance:
if abs(reachy.right_arm.hand.grip_force) < 50:
    print('not holding')
else:
    print('holding')
Record & Replay Trajectories
So far, we have showed you how to make your robot move using goto and pre-defined position. This works well for simple motion. But sometimes you would like to have more complex motions. That's when another technique comes into place: recording by demonstration.
Record by demonstration
With this approach, you will demonstrate whole trajectories on Reachy by moving it by hand (using the compliant mode) and record its position at high-frequency (about 100Hz). Depending on what you want, you can record a single motor, or multiple at the same time. We provide a TrajectoryRecorder object that makes this process really simple.
For instance, assuming you want to record a movement on the Right Arm and that it is already compliant:
recorder = TrajectoryRecorder(reachy.right_arm.motors)
And when you are ready to record:
recorder.start()
And when the movement is over:
recorder.stop()
The recorded trajectories can then be accessed via:
print(recorder.trajectories)
>>> TODO
You can save it as a numpy array using:
import numpy as np

np.savez('my-recorded-trajectory.npz', **recorder.trajectories)
The recorder can be restart as many times as you want. A new trajectory will be recorded on store as recorder.trajectories.
You can record any list of motors. For instance if you want to record the arm yaw and the gripper you can use:
recorded_motors = [reachy.right_arm.arm_yaw, reachy.right_arm.hand.gripper]

recorder = TrajectoryRecorder(recorded_motors)

recorder.start()
time.sleep(10)
recorder.stop()
Replay a trajectory
Let's say you have recorded a nice motion and save it on the disk using the code above. You can first reload it at any time using:
my_loaded_trajectory = np.load('my-recorded-trajectory.npz')
Then, you want to play it on the robot. To do that, we have created an object called TrajectoryPlayer. It can be used as follow:
trajectory_player = TrajectoryPlayer(reachy, my_loaded_trajectory)
First, you need to specify on which robot you want to play the trajectory. If you have multiple Reachy, you can record a movement on one and play it on the other. Then, you need to specify which trajectory you want to play.
Assuming the motors you want to use to play the trajectory are stiff and that the robot is in position where he can play the trajectory:
trajectory_player.play(wait=True, fade_in_duration=1.0)
The code above will play the trajectory, wait for it to finish.
The fade_in_duration ensure there is no jump at the begining of the motion. Indeed, if you play a trajectory from a different starting point that what you record, the robot will try to reach this starting position as fast as it can. This parameter basically says, “first goto the recorded starting position in 1s, then play the trajectory”.
Always think about starting position before recording and replaying trajectories!
You can also play multiple trajectories as a sequence. Assuming you have recorded three motion (traj_1, traj_2 and traj_3):
TrajectoryPlayer(reachy, traj_1).play(wait=True, fade_in_duration=1)
TrajectoryPlayer(reachy, traj_2).play(wait=True, fade_in_duration=1)
TrajectoryPlayer(reachy, traj_3).play(wait=True, fade_in_duration=1)
or in a more concise way:
for traj in [traj_1, traj_2, traj_3]:
    TrajectoryPlayer(reachy, traj).play(wait=True, fade_in_duration=1)
Work on a trajectory - Smoothing
Recorded trajectories are actually simple objects. It's a dict in the form:
{motor_name: numpy_array_of_position}
Position arrays have the same length for all motors. You can thus convert the whole trajectory as a 2D array of shape MxS where M is the number of motor and S is the number of sample in the trajectory. The number of sample corresponds roughly to the duration in seconds x 100 (the default sampling frequency).
By recording a trajectory by demonstration, you may sometimes also record involuntary movements or jerkiness. When replayed, you may observe such artefacts. A good practice is to actually apply some smoothing/filtering on the trajectory before saving it.
As they are store as numpy arrays, you can use all typical libraries for this task (numpy/scipy/etc). Depending on the type of movements you recorded or what you want to do (eg. really smooth and slow moves, accurate trajectory, etc), the smoothing you want to apply may vary and there is not a single approach that will work for all types of moves.
We still provide a cubic smooth functionalities as it is something we often use. The cubic smoothing will garantee to have continuous acceleration which is really important for human perception. You simply need to choose the number of keypoints that will be used to represent your smoothed trajectory.
from reachy.trajectory.interpolation import cubic_smooth

smoothed_trajectories = cubic_smooth(recorder.trajectories, nb_kp=10)
The cubic smooth function will keep the same number of samples by default. But you can modify this behavior using the out_points parameters.
Arm coordinate system
Joint coordinates
In all examples above, we have used what is called joint coordinates. This means that we have controlled each joint separately.
Kinematic model
Controlling a robot in joint coordinates can be hard and is often far from what we actually do as humans. When we want to grasp an object in front of us, we think of where we should put our hand, not how to flex each individual muscle to reach this position. This approach relies on the cartesian coordinates: the 3D position and orientation in space.
Forward and Inverse Kinematics is a way to go from one coordinates system to the other:
- forward kinematics: joint coordinates –> cartesian coordinates
- inverse kinematics: cartesian coordinates –> joint coordinates
We have defined the whole kinematic model of the arm. This means the translation and rotation required to go from one joint to the next one. On a right arm equipped with a force gripper this actually look like this:
| Motor | Translation | Rotation |
|---|---|---|
| shoulder_pitch | (0, -0.19, 0) | (0, 1, 0) |
| shoulder_roll | (0, 0, 0) | (1, 0, 0) |
| arm_yaw | (0, 0, 0) | (0, 0, 1) |
| elbow_pitch | (0, 0, -0.28) | (0, 1, 0) |
| forearm_yaw | (0, 0, 0) | (0, 0, 1) |
| wrist_pitch | (0, 0, -0.25) | (0, 1, 0) |
| wrist_roll | (0, 0, -0.0325) | (1, 0, 0) |
| gripper | (0, -0.01, -0.075) | (0, 0, 0) |
This describe the translation and rotation needed to go from the previous motor to the next one. We actually use a simplified Denavit Hartenberg notation.
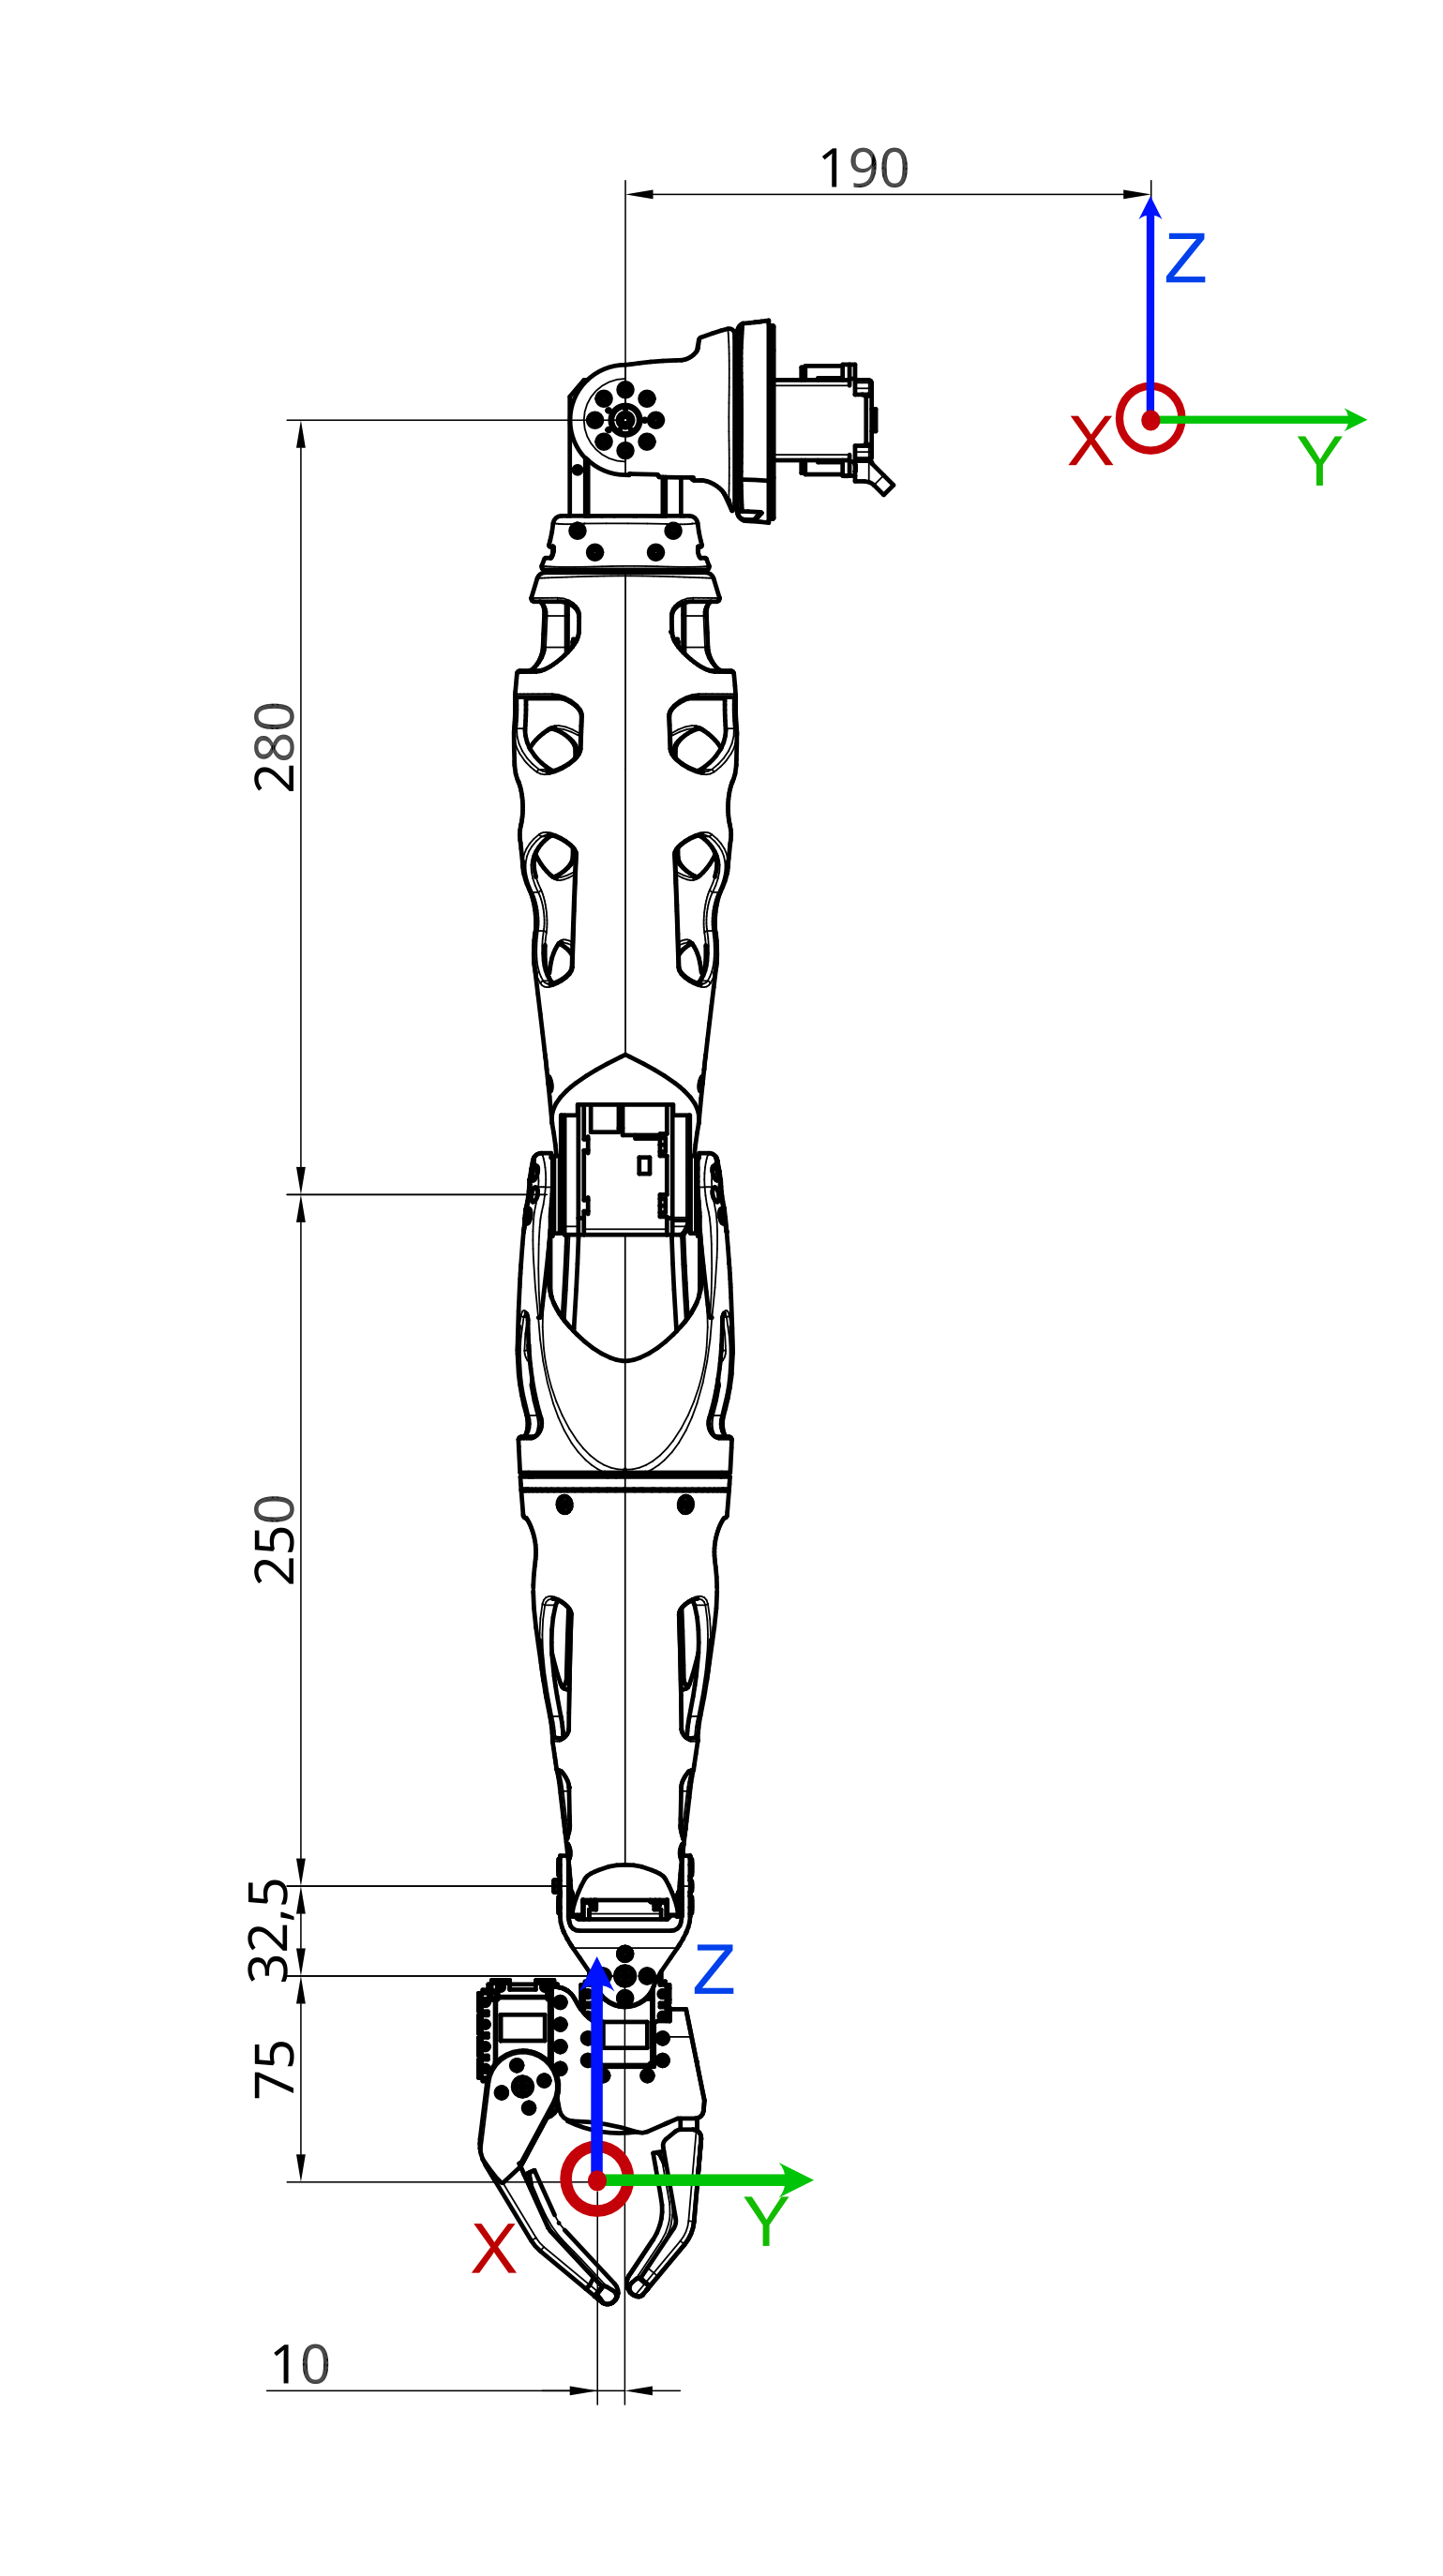
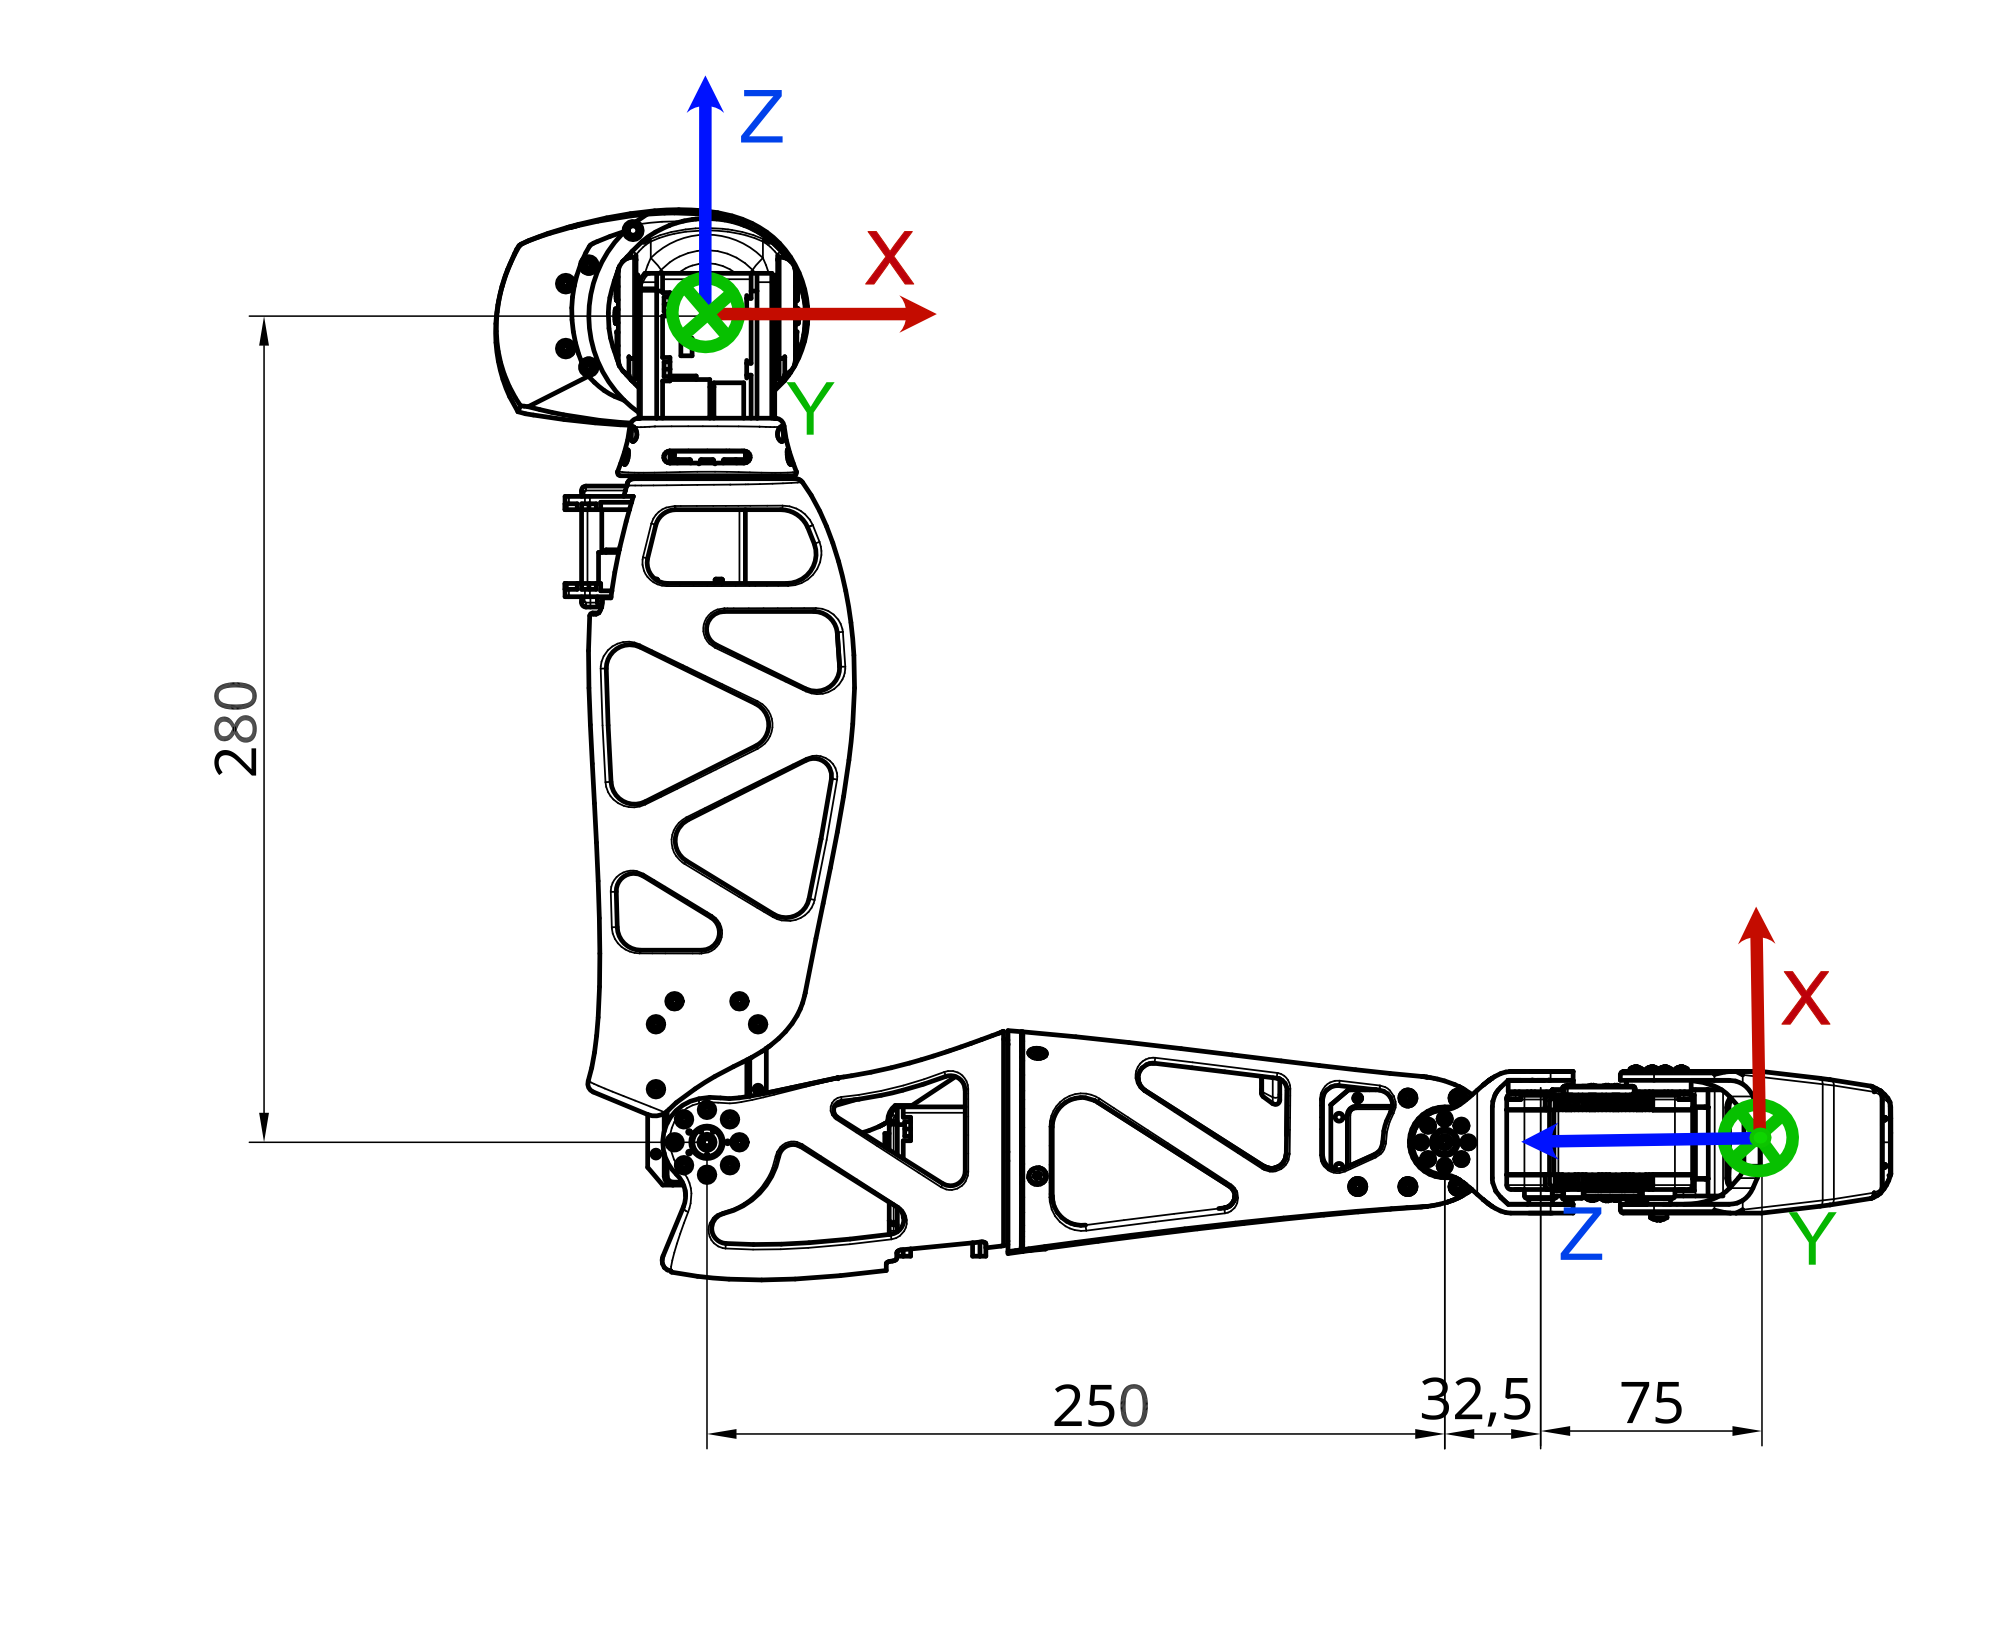
To use and understand kinematic model, you need to know how Reachy coordinate system is defined (from Reachy's perspective):
- The X axis corresponds to the foward arrow.
- The Y axis corresponds to the right to left arrow.
- The Z axis corresponds to the up arrow.
And the origin of this coordinate system is located in the upper part of the robot trunk. Basically, if you imagine a segment going from the left shoulder to the right shoulder of the robot, the origin is the middle of this segment.
The units used for this coordinate system are the meter. So the point (0.3, -0.2, 0) is 30cm in front of the origin, 20cm to the right and at the same height.
Forward kinematics
Using the joint coordinates and the kinematic model defined above, we can actually compute the 3D position and orientation of any joint in the arm. This question can be formalized as a trigonometry problem and it's called the forward kinematics.
We provide a function to directly compute the forward kinematics of a reachy arm. Assuming you are working on a Right Arm with a Force Gripper (8 joints), you can find the pose when all motors are at their zero position:
print(reachy.right_arm.forward_kinematics(joints_position=[0, 0, 0, 0, 0, 0, 0, 0]))
>>> array([[ 1.     ,  0.     ,  0.     ,  0.     ],
           [ 0.     ,  1.     ,  0.     , -0.2    ],
           [ 0.     ,  0.     ,  1.     , -0.6375 ],
           [ 0.     ,  0.     ,  0.     ,  1.     ]])
The 4x4 matrix returned by the forward kinematics method is what is often called a pose. It actually encodes both the 3D translation (as a 3D vector) and the 3D rotation (as a 3x3 matrix) into one single representation. $$\begin{bmatrix} R_{11} & R_{12} & R_{13} & T_x\\\
R_{21} & R_{22} & R_{23} & T_y\\\
R_{31} & R_{32} & R_{33} & T_z\\\
0 & 0 & 0 & 1 \end{bmatrix}$$
You can also get the current pose by doing:
current_position = [m.present_position for m in reachy.right_arm.motors]
print(reachy.right_arm.forward_kinematics(joints_position=current_position))
>>> array([[ 0.001,  0.   , -1.   ,  0.316],
           [ 0.   ,  1.   ,  0.   , -0.209],
           [ 1.   , -0.   ,  0.001, -0.308],
           [ 0.   ,  0.   ,  0.   ,  1.   ]])
If you are using an external 3D tracker, you may observe a difference between your measure of the end effector and the one given by the forward kinematics. Keep in mind that the forward kinematics rely on a theoretical model of the Reachy arm. You may have difference due to motor jerk or assembly approximation.
Inverse kinematics
Knowing where you arm is located in the 3D space can be useful but most of the time what you want is to move the arm in cartesian coordinates. You want to have the possibility to say: “move your hand to [x, y, z] with a 90° rotation around the Z axis”.
This is what inverse kinematics does. We have provided a method to help you with that. You need to give it a 4x4 target pose (as given as a result by the forward kinematics) and an initial joint state.
To make this more concrete, let's first try with a simple example. We will make the hand of the robot goes from a point A to a point B in 3D space. You always have to provide poses to the inverse kinematics that are actually reachable by the robot.
For our starting point, let's imagine a point in front of the robot rigth shoulder and slightly below. If you remember Reachy coordinate system, we can define such a point with the following coordinates: $$A=(0.3, -0.2, -0.3)$$
For our end point we will stay in a parallel plan in front of the robot (we keep the same x) and move to the upper left (20cm up and 20cm left). This gives us a B point such that:
$$B=(0.3, 0.0, -0.1)$$
But having the 3D position is not enough to design a pose. You also need to provide the 3D orientation. The identity rotation matrix corresponds to the zero position of the robot, ie. when the hand is facing toward the bottom. So if we want the hand facing forward when going from A to B, we need to rotate it from -90° around the y axis.
The corresponding matrix can be obtained from scipy:
from scipy.spatial.transform import Rotation as R

print(R.from_euler('y', np.deg2rad(-90)).as_matrix(), 2)
>>> array([[ 0., -0., -1.],
           [ 0.,  1., -0.],
           [ 1.,  0.,  0.]])
By combining the position and orientation, this give us the following poses:
A = np.array((
    (0, 0, -1,  0.3),
    (0, 1,  0, -0.2),
    (1, 0,  0, -0.3),
    (0, 0,  0,  1),
))

B = np.array((
    (0, 0, -1,  0.3),
    (0, 1,  0,  0.0),
    (1, 0,  0, -0.1),
    (0, 0,  0,  1),
))
Finding the correct poses may be tricky, especially the orientation. You can always use the forward kinematics, with joint positions that corresponds roughly to where you are trying reach, to get a reference position and orientation.
The inverse kinematics is also often used in combination with an external tracking system that can provide 3D pose of predefined object. In such case, you only need to make sure to express all pose in the same coordintate system.
The basic inverse kinematics used for Reachy relies on optimisation techniques. Results will thus largely depend on the initial guess you provide (if you are not supplying one, the current joints position of the robot will be used).
In our case, we can imagine that a base position could corresponds to moving the elbow to -90 to face forward, thiss give us the full joint position to be [0, 0, 0, -90, 0, 0, 0, 0].
If we put everything together, we can now ask the inverse kinematics to compute the joint position that corresponds to our A and B poses:
JA = reachy.right_arm.inverse_kinematics(A, q0=[0, 0, 0, -90, 0, 0, 0, 0])
print(np.round(JA, 2))
>>> [3.1, 0.9, 0.82, -94.39, 1.18, 0.43, -0.8, 0.]

JB = reachy.right_arm.inverse_kinematics(B, q0=[0, 0, 0, -90, 0, 0, 0, 0])
print(np.round(JB, 2))
>>> [-21.25, 10., 42.65, -110.79, 16.46, 39.25, -28.3, 0.]
You can then define a goto_right_arm_joint_solution and use it to go from A to B:
import time

def goto_right_arm_joint_solution(joint_solution, duration, wait):
    reachy.goto({
        m.name: j
        for j, m in zip(joint_solution, reachy.right_arm.motors)
    }, duration=duration, wait=wait)

goto_right_arm_joint_solution(JA, duration=2, wait=True)

time.sleep(2)

goto_right_arm_joint_solution(JB, duration=2, wait=True)
You should have seen the robot follow the 3D line that we defined!
Inverse kinematics is a really powerful way to define motions in coordinate systems that fits better with the defintion of many tasks (grasp the bottle in (x, y, z) for instance). Yet, this approach has also some important limitations.
First, it's important to understand that while the forward kinematics has a unique and well defined solution, the inverse kinematics is a much harder and ill defined problem. A Right Arm with a Gripper has 8 Degrees Of Freedom (8 motors) meaning that you may have multiple solutions to reach the same 3D point in space.
Second, there are many approaches to solve the inverse kinematics. The main one used in Reachy is based on an black-box optimisation technique that may take time to converge. You also need to give it a starting point that may have a tremendous influence on the final result. Other approaches can be used but they all have they pros and cons and you may use one or the other depending on the task you are trying to solve.
Motor temperature and security
The motor used in Reachy arm are servo-motors and they are providing extra information.
You can get their current temperature (in °C). For instance, to get the temprature of the elbow_pitch you can simply do:
print(reachy.right_arm.elbow_pitch.temperature)
>>> 34.1
There is an automatic behavior that monitors those temperature and will turn on the fan inside the arm to cool it down if needed. A temperature above 45°C will trigger the fan, while going below 40°C will turn it off.
There is also an internal safety inside the motor that will automatically shut the motor down if it reaches 55°C. This is to avoid damaging a motor. To turn it on again, you will have to power it off and on again. There is also an overload safety. It will also shutdown the motor if the load applied on the motor is too high for a period of time. See the Safety first section for more details.