Arm kit software installation
How to install Reachy's Arm kit software.
You decided to buy an Arm kit, you have a few things to install on your computer. Don’t worry, we will go step by step to guide you through the installation process!
Prerequisites
The low-level software used to control the robot has been developed to work on Linux Ubuntu 20.04. While it should work on other OS, we strongly recommend using the same version.
Presentation
Reachy’s software installation is divided into two main parts:
- installing ROS2 Foxy and the ROS2 packages developped for Reachy
- installing the Python packages developped for Reachy
If you are not familiar with ROS, it stands for Robotics Operating System and is basically a set of software libraries and tools that help build robot applications. It is commonly used in Robotics. You don’t need to know how to use ROS to work with Reachy thanks to the Python SDK that we developped but if you want to learn about ROS, we suggest taking a look at their great tutorials.
Also, you can check this page to know more about how Reachy’s software is organised.
Now back to the installation!
Install ROS2 Foxy
As explained above, Reachy’s software runs on ROS 2 Foxy so first of all, you need to install it on your computer. Based on the official ROS2 documentation, here are the steps to do the installation. In a terminal, in your computer:
sudo apt update && sudo apt install curl gnupg2 lsb-release
sudo curl -sSL https://raw.githubusercontent.com/ros/rosdistro/master/ros.key  -o /usr/share/keyrings/ros-archive-keyring.gpg
echo "deb [arch=$(dpkg --print-architecture) signed-by=/usr/share/keyrings/ros-archive-keyring.gpg] http://packages.ros.org/ros2/ubuntu $(lsb_release -cs) main" | sudo tee /etc/apt/sources.list.d/ros2.list > /dev/null
sudo apt update
sudo apt install ros-foxy-desktop

sudo apt install -y python3-argcomplete
sudo apt install python3-colcon-common-extensions
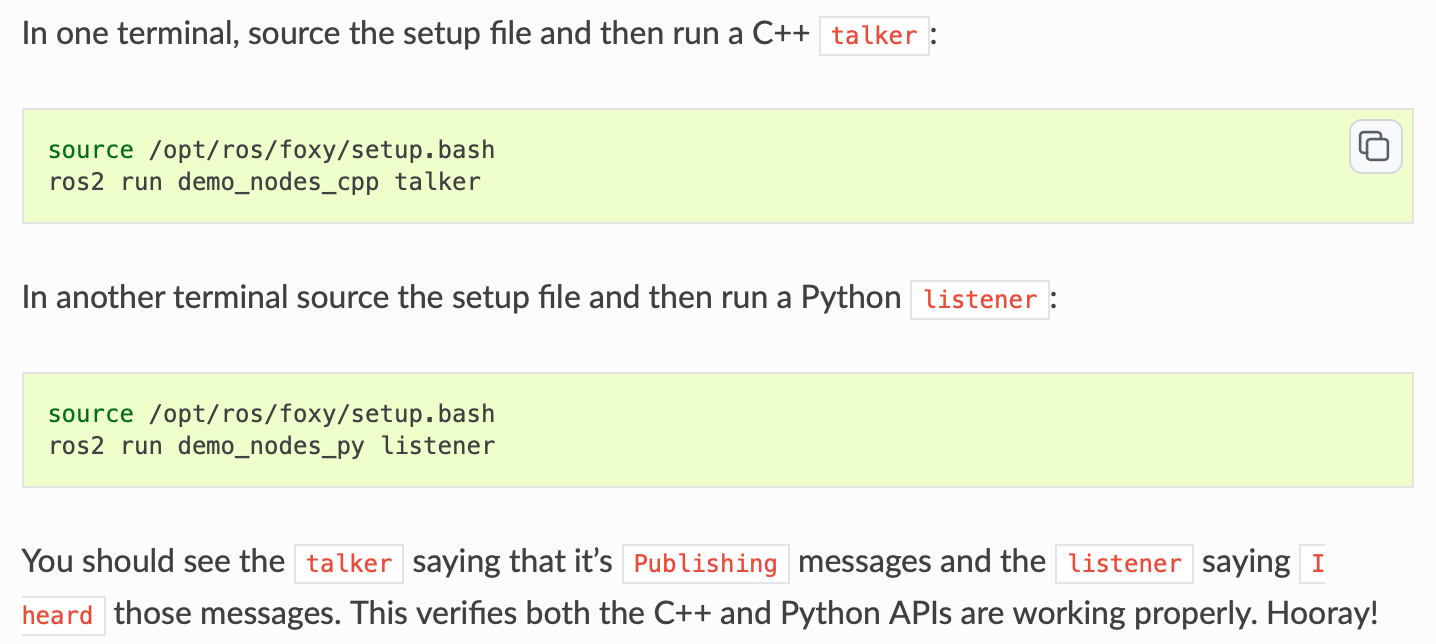
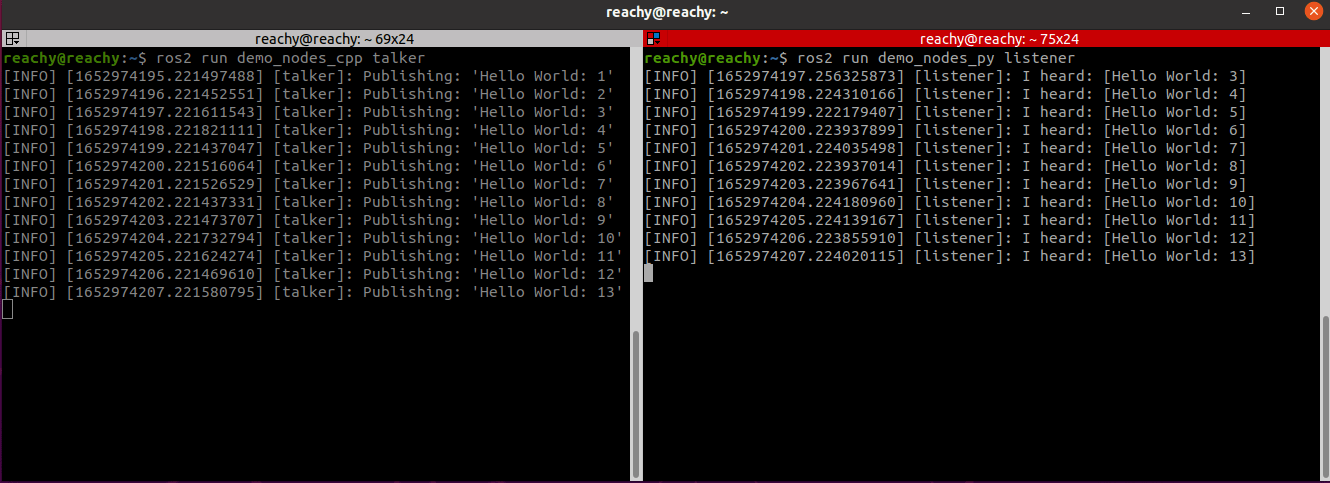
Check that the installation went well
To make sure that ROS2 Foxy has been successfully installed, you can run the test example from ROS2 Foxy. Taken from the ROS2 Foxy documentation:
Your two terminals should look like this:
Install Reachy’s ROS2 packages
Create a dedicated workspace
Now that you have installed ROS, you need to create a ROS workspace to install the specific ROS packages for Reachy.
Create it in your $HOME folder:
mkdir -p ~/reachy_ws/src
Build your empty workspace once to set everything up.
cd ~/reachy_ws
source /opt/ros/foxy/setup.bash
colcon build
Once done, add commands to your .bashrc file so that you won’t have to type them in each new terminal.
echo "source /opt/ros/foxy/setup.bash" >> ~/.bashrc
echo "source /home/reachy/reachy_ws/install/setup.bash" >> ~/.bashrc
echo "source /usr/share/colcon_cd/function/colcon_cd.sh" >> ~/.bashrc
echo "export _colcon_cd_root=~/ros2_install" >> ~/.bashrc
In the seconde line, replace the reachy in /home/reachy/reachy_ws/install/setup.bash with your username.
Finally, source your .bashrc file:
source ~/.bashrc
Clone Reachy’s ROS2 packages
Now you’re ready to install Reachy’s ROS2 packages in the workspace you just created. The packages are the following:
cd ~/reachy_ws/src
git clone https://github.com/pollen-robotics/reachy_msgs.git
git clone https://github.com/pollen-robotics/reachy_controllers.git
git clone https://github.com/pollen-robotics/reachy_kinematics.git
git clone https://github.com/pollen-robotics/reachy_sdk_server.git
git clone https://github.com/pollen-robotics/reachy_description.git
Once everything cloned in your ROS2 workspace, build the packages:
cd ~/reachy_ws
colcon build
Install Reachy’s Python packages
We recommend working in a virtual environment to install Reachy’s Python packages.
Dependencies
Some of Reachy’s Python packages have dependencies that you should install. The dependencies are numpy, scipy, pyquaternion, sklearn, pykdl.
- Using pip install:
pip3 install numpy
pip3 install scipy
pip3 install pyquaternion
pip3 install sklearn
- Using apt install:
sudo apt install python3-pykdl
We also recommend to install the jupyter and matplotlib libraries.
pip3 install jupyter
pip3 install matplotlib
Cloning the Python packages
Create another folder dev that will contain all the packages used with Reachy that are not based on ROS.
mkdir ~/dev
In this folder you will need the following repositories:
cd ~/dev
git clone https://github.com/pollen-robotics/reachy_pyluos_hal.git
git clone https://github.com/pollen-robotics/reachy-sdk-api.git
git clone https://github.com/pollen-robotics/reachy-sdk.git
Install the packages after the cloning.
cd ~/dev/reachy_pyluos_hal
pip3 install -e .

cd ~/dev/reachy-sdk-api
pip3 install -e python

cd ~/dev/reachy-sdk
pip3 install -e .
To learn more on the repositories content and usage, please refer to README.md files in each repository.
Other
Open ports for serial use
By default, on a Ubuntu install, when using serial, users do not have the right to access the ports. Give rights to open /dev/ttyUSB ports:
sudo usermod -a -G tty <usr_name>
sudo usermod -a -G dialout <usr_name>
Set the correct configuration file
As Reachy software is meant to work with different robot configurations. Several configuration files are available.
By default, the configuration is set to a full robot. You need to modify it to your own configuration.
Open .bashrc:
nano ~/.bashrc
And add an environment variable REACHY_MODEL that designates your model.
For example, to configure only a right arm:
export REACHY_MODEL="robotic_arm_right"
Make sure to source your .bashrc file to take the modification into account:
source ~/.bashrc
Generate a system.d file for auto-startup
If you want that all Reachy’s ROS2 packages start automatically when your computer starts, you can use our systemd file:
cd ~/reachy_ws/src/reachy_sdk_server
bash generate-service-file.bash
This command should have created a file called reachy_sdk_server.service. To activate this service, you need to copy it to systemd:
sudo cp reachy_sdk_server.service /etc/systemd/system
Enable it for the service to be launched automatically when you restart your computer:
sudo systemctl enable reachy_sdk_server.service
You can manually start it doing:
sudo systemctl start reachy_sdk_server.service
Note: You need to connect the arm to your computer before starting a service. If you enabled the service, connect your arm to your computer before turning it on.
For more information on the services, please refer to section Using services.
If you want to work directly at the ROS level
If you prefer using the ROS2 packages instead of the Python SDK, you can find launch files in each of our ROS packages to set them up. In particular, you can run:
ros2 launch reachy_kinematics kinematics.launch.py
# (for description and kinematics)
ros2 launch reachy_controllers joint_state_controller.launch.py
# (for joint_state, joint_goals, fans, sensors, etc.)
If you want to use the SDK, we provide a specific launcher file that starts everything (including the above mentioned ROS packages) at once:
ros2 launch reachy_sdk_server run_everything_no_head.launch.py
For more information, check the page Working with ROS2 Foxy
Final checking
Everything should now be installed on your computer to start working with Reachy! Let’s check this out.
First, if you created reachy_sdk_server.service to start everything in background, stop it.
sudo systemctl stop reachy_sdk_server.service
Then, launch the ROS2 packages in a terminal:
cd ~/reachy_ws/ros2 launch reachy_sdk_server run_everything_no_head.launch.py
The output in the terminal should look like this:
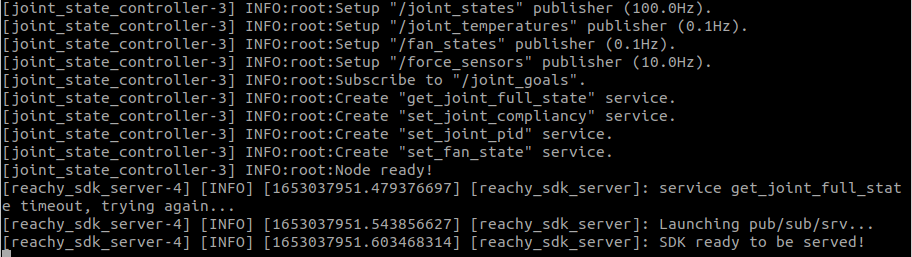
Especially, you should see the line: SDK ready to be served!.
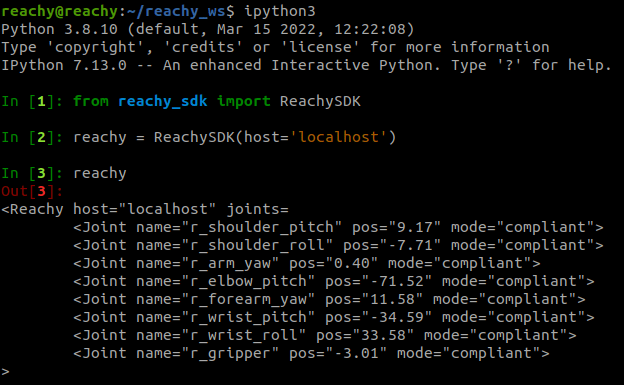
Finally you can check that you can connect to the arm using Reachy’s Python SDK.
In a python terminal:
>>> from reachy_sdk import ReachySDK

>>> reachy = ReachySDK(host='localhost')

>>>reachy
For a robotic right arm, the outputs should look like this:
If both of these are ok the arm’s software installation should have went well!