4. Use arm kinematics
Harness arm kinematics to create movements
Arm coordinate system
Joint coordinates
If you remember the goto() function, to generate a trajectory for the arm, you need to pass a list of joints with the requested position as an argument.
For example, to place the right arm in a right-angled position, we defined the following list:
right_angled_position = [0, 10, -10, -90, 0, 0, 0]
and then called the function with it:
reachy.r_arm.goto(right_angled_position)
In this basic arm control, we used what is called joint coordinates to move Reachy. This means that we controlled each joint separately.
Controlling a robot in joint coordinates can be challenging and is often far from what we naturally do as humans. When we want to grasp an object, we think of where to place our hand, not how to flex each individual muscle to reach that position. This approach relies on cartesian coordinates: the 3D position and orientation in space. This is where the kinematic model comes into play.
Kinematic model
The kinematic model describes the motion of a robot mathematically without considering forces or torques. It focuses solely on the geometric relationships between elements.
We have defined the full kinematic model of the arm, including the translation and rotation required to move from one joint to the next. For a right arm equipped with a gripper, it looks like this:
| Joint | Translation | Rotation |
|---|---|---|
| r_arm.shoulder.pitch | (0, -0.019, 0) | (0, 1, 0) |
| r_arm.shoulder.roll | (0, 0, 0) | (1, 0, 0) |
| r_arm.elbow.yaw | (0, 0, -0.280) | (0, 0, 1) |
| r_arm.elbow.pitch | (0, 0, 0) | (0, 1, 0) |
| r_arm.wrist.roll | (0, 0, -0.120) | (0, 0, 1) |
| r_arm.wrist.pitch | (0, 0, 0) | (0, 1, 0) |
| r_arm.wrist.yaw | (0, 0, 0) | (1, 0, 0) |
| r_arm.gripper | (0, ??, ??) | (0, 0, 0) |
To use and understand the kinematic model, you need to know how Reachy’s coordinate system is defined (from Reachy’s perspective). See below:
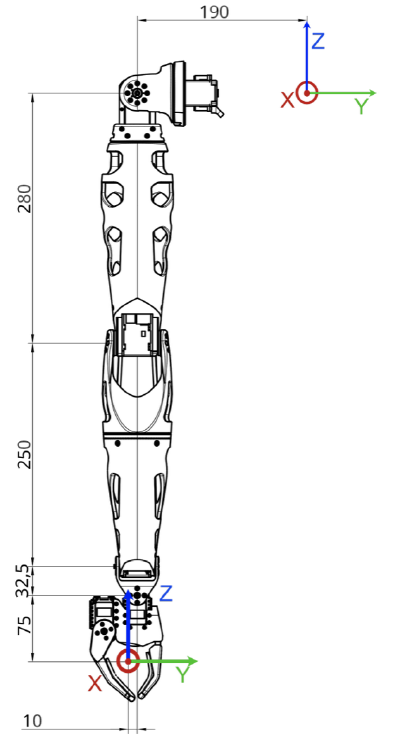
- The X axis corresponds to the forward arrow.
- The Y axis corresponds to the right-to-left arrow.
- The Z axis corresponds to the upward arrow.
The origin of this coordinate system is located in the upper part of the robot trunk, inside Reachy. Imagine a segment from the left shoulder to the right shoulder—the origin is the midpoint of this segment, just behind the center of Pollen’s logo on Reachy’s torso.

Units in this coordinate system are meters. For example, the point (0.3, -0.2, 0) is 30 cm in front of the origin, 20 cm to the right, and at the same height.
End effector location
The end effector is a virtual joint located in the gripper and referred to as ‘right_tip’ or ’left_tip’ in the URDF file, as shown below.
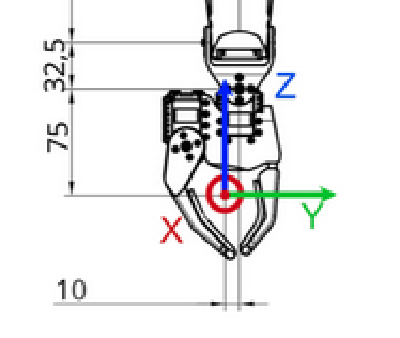
The red dot corresponds to the ‘right_tip’. You can see the right and left end-effectors animated below.
Switching between joint and cartesian coordinates
Forward and inverse kinematics are methods to transition between these coordinate systems:
- Forward kinematics: joint coordinates → cartesian coordinates.
- Inverse kinematics: cartesian coordinates → joint coordinates.
Forward kinematics
Using the kinematic model, we can compute the 3D position and orientation of the right or left end-effector with the forward_kinematics() method.
forward_kinematics()
Each arm has a forward_kinematics() method. To use it, first connect to your Reachy.
from reachy2_sdk import ReachySDK

reachy = ReachySDK(host='10.0.0.201')  # Replace with the actual IP

reachy.r_arm.forward_kinematics()
>>> array([[-0.015,  0.001, -1.   ,  0.384],
       [ 0.086,  0.996, -0.001, -0.224],
       [ 0.996, -0.086, -0.015, -0.273],
       [ 0.   ,  0.   ,  0.   ,  1.   ]])
The method returns a 4x4 matrix indicating the position and orientation of the end effector in Reachy 2’s coordinate system.
If no argument is specified, it gives the current 3D position and orientation of the end effector.
You can compute forward kinematics for other joint positions by providing a seven-element-long list as an argument. The arm will not move, but you can get the target position and orientation of the arm in this configuration.
For example, for the right arm’s right-angled position:
reachy.r_arm.forward_kinematics([0, 0, 0, -90, 0, 0, 0])
>>> array([[-0.045, -0.168, -0.985,  0.387],
       [ 0.255,  0.951, -0.174, -0.205],
       [ 0.966, -0.259, -0.   , -0.27 ],
       [ 0.   ,  0.   ,  0.   ,  1.   ]])
Understand the result
The 4x4 matrix returned by the forward_kinematics() method is often referred to as a pose. It encodes both the 3D translation (a 3D vector) and the 3D rotation (a 3x3 matrix) into a single representation: the 4x4 homogeneous transformation matrix. 😎
$$\begin{bmatrix} R_{11} & R_{12} & R_{13} & T_x\\ R_{21} & R_{22} & R_{23} & T_y\\ R_{31} & R_{32} & R_{33} & T_z\\ 0 & 0 & 0 & 1 \end{bmatrix}$$
The following function returns the current pose of the right end-effector based on the present position of each joint in the right arm:
reachy.r_arm.forward_kinematics()
You can also compute the pose for a given joints position. To do that, just pass the list of position as argument of forward_kinematics. Be careful to respect the order of the position you give and to give all the joints in the arm kinematic chain (i.e. from shoulder_pitch to wrist_roll).
For example, we can compute the forward kinematics for the right-angle position we defined earlier.
reachy.r_arm.forward_kinematics(right_angle_position)
>>> array([[ 0.    ,  0.    , -1.    ,  0.3675],
       [ 0.    ,  1.    ,  0.    , -0.202 ],
       [ 1.    ,  0.    ,  0.    , -0.28  ],
       [ 0.    ,  0.    ,  0.    ,  1.    ]])
With this result, we can tell that when the right arm is in the right angle position, the right end-effector is 37cm in front of the origin, 20cm to the left and 28cm below the origin.
As of the rotation matrix, the identity matrix corresponds to the zero position of the robot which is when the hand is facing toward the bottom.
Here we obtained the rotation matrix
$$\begin{bmatrix} 0 & 0 & -1\\ 0 & 1 & 0 \\ 1 & 0 & 0 \end{bmatrix}$$
We can use scipy to understand what this matrix represents.
from scipy.spatial.transform import Rotation as R
import numpy as np

R.from_matrix([
    [0, 0, -1],
    [0, 1, 0],
    [1, 0, 0],
]).as_euler('xyz', degrees=True)
>>> array([0., -90,0.])
So scipy tells us that a rotation of -90° along the y axis has been made to get this matrix, which is coherent with the result because having the hand facing forward corresponds to this rotation according to Reachy’s xyz axis that we saw above.
Inverse kinematics
The inverse kinematics is the exact opposite of the forward kinematics. From a 4x4 pose in Reachy 2 coordinate system, it gives a list of joints positions to reach this target.
Knowing where your arm is located in the 3D space can be useful but most of the time what you want is to move the arm in cartesian coordinates. You want to have the possibility to say:
“Move your hand to [x, y, z] with a 90° rotation around the Y axis”.
This is what goto() does, if the input is a 4x4 matrix.
inverse_kinematics()
Each arm has an inverse_kinematics() method. To use it, you first need to connect to your Reachy.
You need to specify a target pose in Reachy coordinate system as an argument.
Let’s for example ask the inverse kinematics of the current pose, using the forward kinematics.
from reachy2_sdk import ReachySDK

reachy = ReachySDK(host='10.0.0.201')  # Replace with the actual IP

reachy.r_arm.inverse_kinematics(reachy.r_arm.forward_kinematics())
>>>  [0, 10, -10, -90, 0, 0, 0]
The method returns a seven-element-long list indicating the position of each arm joint, in the usual order:
- r_arm.shoulder.pitch
- r_arm.shoulder.roll
- r_arm.elbow.yaw
- r_arm.elbow.pitch
- r_arm.wrist.roll
- r_arm.wrist.pitch
- r_arm.wrist.yaw
Contrary to the forward kinematics which has a unique answer (giving all joints values will always put the end effector at the same target position), inverse kinematics can have an infinite number of answers (for a target position of the end effector, several combinations of joints angles are possible).
A word about reachability
Not all poses are reachable. A simple case of a non-reachable pose is one that is too far away. A more complex case would be a pose that would require at least one joint to go beyond its physical limits in order to get there. One can imagine poses where the wrist is hyper-flexed, or the elbow is bent backwards.
The Inverse Kinematics uses a symbolic algorithm that always knows if a pose is reachable or not (free from numerical solver pitfalls like initial seed dependence or local minima).
If the pose is not reachable, the inverse_kinematics() function will raise an exception. Therefore it’s a good practice to call it using try/except keywords.
💡 You can move the arm with your hand in compliant mode (meaning turned off) and move it where you want, ask the forward kinematics and you’ll get a pose that is reachable and safe by construction.
Example: square movement in cartesian space
Defining the poses
To make this more concrete, let’s first try with a simple example. We will make the right hand draw a square in 3D space. To draw it, we will define the four corners of a square and Reachy’s right hand will go to each of them.
The virtual corner is represented below.
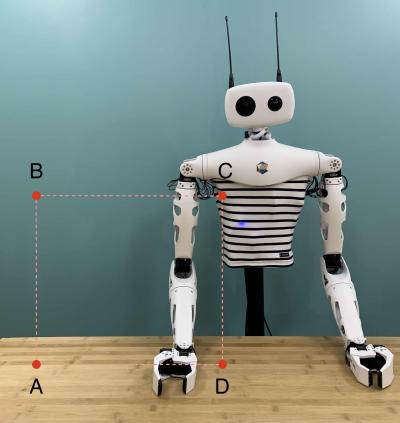
For our starting corner A, let’s imagine a point in front of the robot, on its right and below its base. With Reachy coordinate system, we can define such a point with the following coordinates:
$$A = \begin{pmatrix}0.3 & -0.4 & -0.3\end{pmatrix}$$
The coordinates of B should match A except the z component which should be higher. Hence
$$B = \begin{pmatrix}0.3 & -0.4 & 0.0\end{pmatrix}$$
For the corner C, we want a point on the same z level as B, in the inner space of Reachy and in the same plane as A and B. So we only need to change the y component of B. We can take for example :
$$C = \begin{pmatrix}0.3 & -0.1 & 0.0\end{pmatrix}$$
And to complete our corners, we can deduce D from A and C. D coordinates should match C, except its z component, which must the same as A. Hence
$$D = \begin{pmatrix}0.3 & -0.1 & -0.3\end{pmatrix}$$
But having the 3D position is not enough to design a pose. You also need to provide the 3D orientation via a rotation matrix. It’s often the tricky part when building a target pose matrix.
Keep in mind that the identity rotation matrix corresponds to the zero position of the robot which is when the hand is facing toward the bottom. So if we want the hand facing forward when drawing our virtual square, we need to rotate it from -90° around the y axis, as we saw in the forward kinematics part.
We know from before which rotation matrix corresponds to this rotation, but we can use the SDK to get the 4x4 matrix from a position vector and the rotation given by the Euler angles :
from reachy2_sdk.utils.utils import get_pose_matrix
get_pose_matrix([0.3, -0.4, -0.3], [0,-90,0])
>>> array([[ 0. ,  0. , -1. ,  0.3],
       [ 0. ,  1. ,  0. , -0.4],
       [ 1. ,  0. ,  0. , -0.3],
       [ 0. ,  0. ,  0. ,  1. ]])
We got the 4x4 matrix that we expected!
You can also move the arm with your hand where you want it to be and use the forward kinematics to get an approximation of the target pose matrix you would give to the inverse kinematics.
Here, having the rotation matrix and the 3D positions for our points A and B, we can build both target pose matrices.
| Matrix | Values |
|---|---|
| A | np.array([[0, 0, -1, 0.3], [0, 1, 0, -0.4], [1, 0, 0, -0.3], [0, 0, 0, 1]]) |
| B | np.array([[0, 0, -1, 0.3], [0, 1, 0, -0.4], [1, 0, 0, 0.0], [0, 0, 0, 1]]) |
| C | np.array([[0, 0, -1, 0.3], [0, 1, 0, -0.1], [1, 0, 0, 0.0], [0, 0, 0, 1]]) |
| D | np.array([[0, 0, -1, 0.3], [0, 1, 0, -0.1], [1, 0, 0, -0.3], [0, 0, 0, 1]]) |
Sending the movements commands
As before, we use the goto to send moving instructions to the arm.
import time
# put the joints in stiff mode
reachy.r_arm.turn_on()

# use the goto() method
reachy.r_arm.goto(A)
reachy.r_arm.goto(B)
reachy.r_arm.goto(C)
reachy.r_arm.goto(D)

# put the joints back to compliant mode
# use turn_off_smoothly to prevent the arm from falling hard
reachy.r_arm.turn_off_smoothly()
The result should look like this:
✨ Got everything?
Awesome! Now it’s time to bring Reachy to life and move the head.
Let’s give it some personality! 💫