6. Use the mobile base
First mobile base movements
You can choose to follow our online documentation or directly test the mobile base movements on your Reachy by following the notebook n°5.
Mobile base presentation
The following elements are accessible through reachy.mobile_base:
- Battery level
- Odometry of the base
- Lidar
- Control and drive modes (not detailed here)
goto,translate_by,rotate_by, andset_speedmethods to make the mobile base move.
Information
You can find details by calling the mobile_base attribute directly:
reachy.mobile_base
>>> <MobileBase on=True
 lidar_safety_enabled=True
 battery_voltage=26.3>
battery_voltage
The battery voltage can be directly accessed using reachy.mobile_base.battery_voltage.
reachy.mobile_base.battery_voltage
>>> 26.3
Sensors
The mobile contains a Lidar sensor, accessible with:
reachy.mobile_base.lidar
>>> <Lidar safety_enabled=True>
This Lidar is responsible for object detection, and offers a safety to avoid collision.
The Lidar features are detailed in the dedicated Lidar section.
Frames
Understanding coordinate frames is essential when working with mobile robots, as they define how positions and orientations are interpreted and transformed.
Reachy 2’s mobile base operates using two main reference frames:
- The robot frame, which moves with the robot and defines its egocentric perspective.
- The odom frame, which represents a fixed world reference used to estimate the robot’s global position over time.
These frames follow standard robotics conventions and are crucial for tasks like navigation, localization, and trajectory planning.
Let’s take a closer look at each of them:
Robot frame
The robot frame, also called the egocentric or base_link frame, is rigidly attached to the robot. Its (0, 0) point is the projection on the floor of the center of the mobile base.
X points forward, Y points left, and Theta increases counterclockwise.
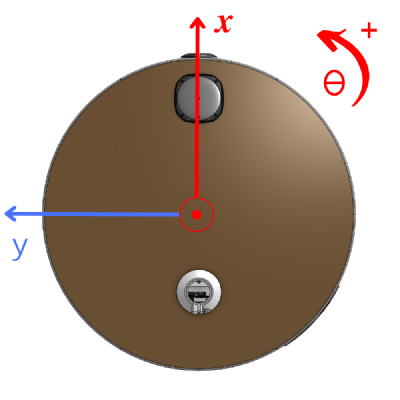
It follows ROS’ conventions described in REP 105 “Coordinate Frames for Mobile Platforms”
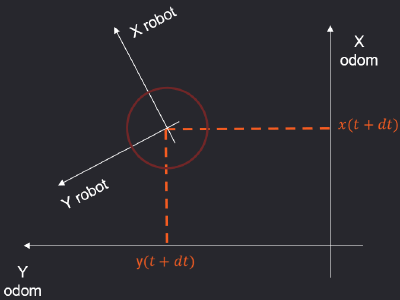
Odom frame
The odom frame is a world-fixed frame. The position (x, y, theta) of the robot in the odom frame is continuously updated through odometry calculations. These calculations currently rely solely on wheel measurements to estimate the robot’s movement. While the robot’s position is continuous, it should never be used as a long-term reference due to inevitable drift.
Resetting the Odom frame
The initial position of the odom frame matches the robot’s position at startup. The odom frame can be reset at anytime to the robot’s current position using:
reachy.mobile_base.reset_odometry()
After this call, the robot’s current position becomes the new origin (0, 0, 0) of the odom frame.
Mobile base goto methods
goto()
Goto target
The mobile base’s goto() method moves to a specified position and orientation within odom frame. The expected target contains three elements:
x(meters)y(meters)theta(degrees)
A simple goto() command on the mobile base will look like:
reachy.mobile_base.goto(x=0.2, y=0, theta=20)
⚠️ Important: The odom frame is world-fixed, and the robot’s position is continuously updated as long as the robot is powered up. By default, if you ask for a goto(0, 0, 0), the robot will attempt to return to its position at boot-up.
To perform a goto() relative to the robot’s current position, use the reset_odometry() method before sending the command.
To get a better grasp of how goto() behaves, follow the examples below—starting by instantiating your robot:
from reachy2_sdk import ReachySDK

reachy = ReachySDK(host='your-reachy-ip')
reachy.mobile_base.turn_on()
🦾 Example 1: Moving forward by 50 cm
Reset the odometry frame and move the robot 50 cm forward:
reachy.mobile_base.reset_odometry()
reachy.mobile_base.goto(x=0.5, y=0.0, theta=0.0)
What it does:
reset_odometry()sets the current position as the origin (0, 0, 0) in the odom frame.- The
goto()command moves the robot 0.5 meters forward from this new origin.
Now, request goto(0, 0, 0). The robot will return to its previous position:
reachy_mobile.mobile_base.goto(x=0.0, y=0.0, theta=0.0)
🦾 Example 2: Sequential movements without resetting odometry
# Move 30cm forward, to reach x=30cm
reachy.mobile_base.goto(x=0.3, y=0.0, theta=0.0)

# Go back by 10cm, to reach x=20cm
reachy.mobile_base.goto(x=0.2, y=0.0, theta=0.0)
What it does:
- The first
goto()moves the robot tox=0.3in the odom frame. - The second
goto()moves the robot to x=0.2 in the same frame, effectively moving it backward by 10 cm..
🦾 Example 3: Sequential movements with odometry reset
Let’s do the same by resetting the odometry between the two commands:
import time

# Move 30cm forward, to reach x=30cm in the current odometry frame
reachy.mobile_base.goto(x=0.3, y=0.0, theta=0.0, wait=True)
time.sleep(0.2)

# Reset odometry to set the current position as the new origin
reachy.mobile_base.reset_odometry()
time.sleep(0.2)

# Move 20cm forward, to reach x=20cm in the new current odometry frame
reachy.mobile_base.goto(x=0.2, y=0.0, theta=0.0)
What it does:
- The robot moves to
x=0.3in the original odom frame. reset_odometry()sets this new position as the origin(0, 0, 0).- The subsequent
goto()moves the robot 0.2 meters forward from this new origin, reachingx=0.5in the original odom frame.
We recommend experimenting with this concept to get familiar.
Goto parameters
Unlike the arms or head, where movement duration is explicitly defined using a duration parameter, the mobile base’s goto() timing behavior is governed by tolerances, timeouts, and the optional wait flag.
These parameters give you fine control over how and when a goto() is considered finished.
Tolerances
Tolerances define how close the robot must be to the goal for the motion to be considered finished.
distance_tolerance (float, in meters)
The maximum distance allowed between the robot’s current(x, y)position and the target to consider thegoto()completed.
→ Default:0.05meters (5 cm)angle_tolerance (float, in degrees by default)
The maximum allowed angular difference to the targetthetabefore the motion is considered complete.
→ Default:5.0degrees
These tolerances do not stop the motion. They simply raise the internal flag that the goto() has “finished”—which is particularly useful when chaining multiple gotos.
- If other
goto()commands are queued, the mobile base will immediately switch to the next one as soon as the flag is raised. - Even after the movement is marked as done, if no other command is queued, the robot continues moving to get closer to the target.
Timeout
- timeout (float)
The timeout parameter provides a way to cap the maximum duration of agoto()command for the mobile base. It defines how long the robot should keep trying to reach the target before aborting the motion.
→ Default timeout: 100 seconds
This is useful to avoid indefinitely waiting when something obstructs the robot or the target is unreachable.
What timeout does
- If the robot reaches the target (within tolerances) before the timeout, the movement ends normally.
- If the timeout is reached before the goal is achieved, the
goto()is interrupted, and the robot immediately stops. - This is different from tolerances: timeouts also stop the physical movement, whereas tolerances only determine when the motion is considered finished (but the robot may keep adjusting its position afterward).
Wait
The wait parameter does work like for the other parts, wait=True will make the function blocking.
The goto() will return only when the motion is considered finished (based on tolerances or timeout).
Degrees
The degrees parameter does work like for the other parts, degrees=False will make the function interpret the theta and angle_tolerance parameters as radians rather than the default degrees.
Examples of mobile base’s goto() usage
Here’s a commented set of examples that demonstrate how to use the goto() function with Reachy 2’s mobile_base, covering various use cases and parameters like wait, tolerances, timeout, and chaining behavior.
🦾 Example 1: Basic movement with wait=True
# Move forward 50 cm and wait until the movement is finished
reachy.mobile_base.goto(x=0.5, y=0.0, theta=0.0, wait=True)
This is the simplest way to send a motion command and wait for it to complete.
🦾 Example 2: Basic use with larger tolerance
# Move forward to x = 0.6m, with 20cm tolerance
reachy.mobile_base.goto(x=0.6, y=0.0, theta=0.0, distance_tolerance=0.2, wait=True)

odom_goto_end = reachy.mobile_base.odometry
print("Odometry when goto is declared as finished:")
print(f"x: {round(odom_goto_end['x'], 3)}")

time.sleep(1)  # Give time for final adjustments

odom_after_motion = reachy.mobile_base.odometry
print("Odometry after the motion has fully finished:")
print(f"x: {round(odom_after_motion['x'], 3)}")
Even though the motion was flagged as complete once within 20 cm of the target, the robot kept adjusting its position, as no other goto() command is queued.
🦾 Example 3: Chaining gotos with default tolerances
goto1 = reachy.mobile_base.goto(x=0.0, y=0.0, theta=0.0)
goto2 = reachy.mobile_base.goto(x=0.6, y=0.0, theta=0.0)
goto3 = reachy.mobile_base.goto(x=-0.2, y=0.0, theta=0.0)
goto4 = reachy.mobile_base.goto(x=0.3, y=0.0, theta=0.0)

# Wait for each motion to finish before logging odometry
for i, goto in enumerate([goto1, goto2, goto3, goto4], start=1):
    while not reachy.is_goto_finished(goto):
        time.sleep(0.05)
    odom = reachy.mobile_base.odometry
    print(f"Odometry after goto{i}: x={round(odom['x'], 3)}")
With the default distance_tolerance=0.05, the odometry will be quite close to the requested target after each goto() is marked as finished.
🦾 Example 4: Chaining gotos with larger tolerances
Let’s use the same targets as Example 3, but with larger tolerances:
goto1 = reachy.mobile_base.goto(x=0.0, y=0.0, theta=0.0, distance_tolerance=0.1)
goto2 = reachy.mobile_base.goto(x=0.6, y=0.0, theta=0.0, distance_tolerance=0.3)
goto3 = reachy.mobile_base.goto(x=-0.2, y=0.0, theta=0.0, distance_tolerance=0.3)
goto4 = reachy.mobile_base.goto(x=0.3, y=0.0, theta=0.0, distance_tolerance=0.1)

for i, goto in enumerate([goto1, goto2, goto3, goto4], start=1):
    while not reachy.is_goto_finished(goto):
        time.sleep(0.05)
    odom = reachy.mobile_base.odometry
    print(f"Odometry after goto{i}: x={round(odom['x'], 3)}")
With these larger tolerances, each goto() will be considered finished earlier, meaning the robot switches to the next motion before reaching the exact target. This may result in less accurate stopping points, but faster chaining.
🦾 Example 5: Forcing a stop after a short timeout
# Move back to base position
reachy.mobile_base.goto(x=0.0, y=0.0, theta=0.0, wait=True)

# Attempt to reach a target, but force stop after 0.5 seconds
reachy.mobile_base.goto(x=0.4, y=0.0, theta=90.0, timeout=0.5)
In this example:
- The robot starts turning and moving forward.
- After 0.5 seconds, the timeout triggers.
- The robot stops, even if it hasn’t reached the target or tolerances.
translate_by() / rotate_by()
Unlike the goto() method, which operates in the odom frame — a world-fixed frame — the translate_by() and rotate_by() methods perform movements relative to the robot’s current position and orientation.
This means commands are interpreted in the robot frame, which moves with the robot.
⚙️ These methods behave like
goto(), including support for parameters likewait,tolerances, andtimeout, but operate in a local reference frame instead of a global one.
Since these methods operate in the robot’s own frame, there is no need to reset odometry beforehand.
🦾 Example: Rotate and move forward
# Rotate the robot by +90° (counterclockwise)
reachy.mobile_base.rotate_by(theta=90)

# Then move forward 30 cm in the new orientation
reachy.mobile_base.translate_by(x=0.3, y=0.0, wait=True)
What it does
After rotating, the robot moves 30 cm in the direction it’s now facing.
Goto-Based Functions
These functions compute the necessary position and orientation in the odom frame behind the scenes and send the appropriate goto() command for you.
Both translate_by() and rotate_by() are goto-based functions. This means:
- They follow the same internal mechanisms as
goto() - They are stackable: you can queue multiple motions
- They are cancelable: you can interrupt them using the appropriate cancel method
- They support most standard mobile base’s
goto()parameters
Important notes on relative behavior
Like for the other parts, these motions are computed relative to the goal of the most recent goto() command — whether that command is currently executing or is queued.
If no goto() command is playing, the movement will be computed relative to the robot’s current pose.
⚠️ Warning: Effect of cancelled goto
If the last goto() command is canceled after being issued, any subsequent translate_by() or rotate_by() calls will still compute their motion based on the original target of the canceled command, not the actual robot position and orientation at cancellation time or the previous goto().
This means:
- The computed motion remains unchanged even if the prior
goto()was interrupted. - The final pose will still be relative to the intended (but not reached) target of that canceled movement.
Mobile base set_goal_speed()
Since Reachy 2’s mobile base is holonomic, it can move in any direction and rotate simultaneously. The set_goal_speed() method allows you to command such motion by specifying velocities in the robot frame:
x_vel- Linear speed in m/s along the X-axis (positive forward).y_vel- Linear speed in m/s along the Y-axis (positive left).rot_vel- Angular speed in deg/s (positive counterclockwise).
You must call send_speed_command() to actually apply the speed to the mobile base.
🦾 Example: Send a goal speed to the mobile base
# Set the desired velocity (0.5 m/s forward, 20 deg/s rotation)
reachy.mobile_base.set_goal_speed(vx=0.5, vy=0.0, vtheta=20.0)

# Send the command
reachy.mobile_base.send_speed_command()
When using set_goal_speed() with send_speed_command(), the commanded speeds are maintained for only 200 ms.
💡 If no new speed command is received within this time window, the robot will automatically stop.
This built-in safety feature ensures that the robot won’t keep moving indefinitely in case of a control loop crash, network drop, or software error.
To maintain continuous movement, you need to send updated speed commands at regular intervals (e.g., every 100–150 ms).
Advanced use (ROS 2)
The HAL implementation:
- listens to the standard
/cmd_veltopic - applies smoothing
- performs kinematic calculations
- send speed commands to the wheels
This makes it easy to create control interfaces using ROS.
ROS 2 Examples:
Note: The HAL includes a drive mode for speed commands with variable durations. While it creates a service instead of relying on a topic, the niche use case did not warrant SDK integration. However, it exists if needed!
Read mobile base position and speed
You can access the current estimated position and velocity of Reachy 2’s mobile base using the get_current_odometry() function:
reachy.mobile_base.get_current_odometry()
>>> {'x': 0.0018306385027244687,
 'y': 0.0533282645046711,
 'theta': -7.456543983885954,
 'vx': 0.0,
 'vy': 0.0,
 'vtheta': 0.0}
Position (x, y, theta):
These values represent the estimated pose of the robot frame (base_link) within the odom frame.
x,y: position in meterstheta: orientation in degrees (increasing counterclockwise)
See the odom frame section to better understand how to read the position.
Velocity (vx, vy, vtheta):
These values represent the instantaneous linear and angular velocities of the robot, but they are expressed in the robot frame (not the odom frame).
vx: forward speed (in m/s, along the robot’s X-axis)vy: lateral speed (in m/s, along the robot’s Y-axis)vtheta: angular velocity (in deg/s, around the robot’s Z-axis)
See the robot frame section to better understand how to read the velocity.
Lidar
Reachy 2’s mobile base includes a built-in safety mechanism using its Lidar sensor to prevent collisions with nearby obstacles.
This system automatically:
- Slows down the mobile base when an obstacle is detected within a warning range.
- Stops movement completely if an obstacle is too close (in the direction of the obstacle).
This allows for safer navigation in dynamic environments without requiring user-side obstacle avoidance.
Disabling Lidar safety (Not recommended)
If your use case requires the robot to approach very close to objects, you can disable this safety layer:
reachy.mobile_base.lidar.safety_enabled = False
⚠️ Use with caution. Once disabled, the robot will no longer stop for obstacles and may collide with them.
To re-enable the feature:
reachy.mobile_base.lidar.safety_enabled = True
Configuring safety distances
Two thresholds control the behavior of the safety system:
safety_slowdown_distance(float, in meters):
When an obstacle is within this distance, the robot begins to slow down.safety_critical_distance(float, in meters):
When an obstacle is closer than this distance, movement in the direction of the obstacle is completely blocked.
You can read or modify them like this:
# Check current distances
print(reachy.mobile_base.lidar.safety_slowdown_distance)
print(reachy.mobile_base.lidar.safety_critical_distance)

# Set custom values
reachy.mobile_base.lidar.safety_slowdown_distance = 0.5  # 50 cm
reachy.mobile_base.lidar.safety_critical_distance = 0.2  # 20 cm
To reset the safety distances to their default values, use:
reachy.mobile_base.lidar.reset_safety_default_distances()
Getting the Lidar map
The get_map() method retrieves a 2D image representation of the environment built from the Lidar data.
lidar_map = reachy.mobile_base.lidar.get_map()
It returns the current map as an RGB image.
No map is available in FAKE mode.
🥳 You now know how to use goto() on any part of Reachy.
But what if you want to do more—like record and replay a movement, or even control Reachy at high frequency in real time?
Spoiler alert: that’s exactly what’s coming next!